Optimizely DXP Deployment API PowerShell Scripts for CI/CD in Azure Devops – Part 3

In my previous posts, we went over the deployment process in the EpiServer DXP environment. The first post went through the original methods that allow for deployment into the DXP environment. The second post went through update 313, which was a massive deployment API update, as well as how to use the API to export an environmental database, and how to sync down environments.
In this post, we’re going to go through the following:
- How to get access to the Deployment Scripts
- How to link the deployment scripts to your DevOps Environment
- Building our solution and creating our artifact for deployment
- Creation of our variable group for key storage
- Generating our API keys from the PAAS Portal
Contents
Open Sourcing the Deployment Scripts for Public Use!
If you’ve read my previous blog posts, you’ve seen the theory and process behind the Development API scripts that I’ve created. These were going to be an in-house set of scripts, but in order to allow for more adoption of this excellent process, I’ve decided to go ahead and open source/release these scripts for all to use.
You may have seen these in use during the webinar that I presented at during the EpiServer Dev Happy Hour series. PowerPoint slides are linked on that page, along with some extra content relating to this blog post series.
The GitHub Repository is located here: https://github.com/ericmarkson/EpiCloud-Scripts
Please feel free to contribute, if you have enhancements or fixes to them! (You can also comment here and/or email me with ideas for how to make these scripts better!)
Contact: eric@epivisuals.dev | eric.markson@perficient.com
Linking the Deployment Scripts
As mentioned above, the scripts that I’ve created are located here: https://github.com/ericmarkson/EpiCloud-Scripts
In order to start linking these scripts to your DevOps instance, the first thing you have to do is make sure you can access it. It must be in your personal GitHub account (or your code) to do this.
The best way I have found to make this happen is to login to your GitHub account (or create one) and then fork the repository. This makes it so you have your own version of the repository that we can use from within your DevOps instance.
The one issue from this is making sure you keep it updated from the upstream (my) repository. This guide may help you do this: https://help.github.com/en/github/collaborating-with-issues-and-pull-requests/syncing-a-fork (Maybe you can automate this from within DevOps 😉 )
Once this is done, lets create the link between DevOps and your GitHub.
To start this, go into the DevOps Project Settings. Inside there, you will see a menu item called “GitHub connections.” When you click that, it should show you a button that will allow you to Connect your GitHub account.
After clicking that button, follow the prompts and complete the process. When you get redirected back to DevOps, select the EpiCloud-Scripts item in the menu, and click Save. It should redirect you back to GitHub to finalize, but once you go through that and it brings you back to DevOps (again…), it should show the proper repository in your GitHub Connections screen.
 |
Artifact Creation via Pipeline/Build
Let’s finally get into Azure DevOps! (Or DevOps Server!)
The first thing we have to do to get the process started is generate the Artifacts.
To do this we have to create a Pipeline, which are now YAML-based.
To start this, in the Pipelines section on the left-nav, click the Pipelines item.
At the top right, you can click the button that says “New pipeline”
From here, select where your code is. If your code is in the DevOps repositories, click the “Azure Repos Git”, or if in GitHub repositories, click “GitHub”.
For the sake of this post, I’m going to click “Azure Repos Git”.
Now, select your repository that you want to base this from.
For a basic solution (such as a new Alloy Project), you can start with the ASP.NET Configuration. This will give you most of the script, but we have to make some tweaks.
You can replace everything after the “NuGetCommand@2” task with the below:
- task: MSBuild@1
  displayName: 'Build Projects'
  inputs:
    solution: '$(solution)'
    msbuildArguments: '/p:DeployOnBuild=True /p:DeployDefaultTarget=WebPublish /p:WebPublishMethod=FileSystem /p:PublishUrl="$(Agent.TempDirectory)SitePackageContentwwwroot"'
    platform: '$(buildPlatform)'
    configuration: '$(buildConfiguration)'
    clean: true
    maximumCpuCount: true

- task: ArchiveFiles@2
  displayName: 'Create Deployment Package'
  inputs:
    rootFolderOrFile: '$(Agent.TempDirectory)SitePackageContent'
    includeRootFolder: false
    archiveType: 'zip'
    archiveFile: '$(Build.ArtifactStagingDirectory)alloy.cms.app.$(Build.BuildId).nupkg'
    replaceExistingArchive: true

- task: PublishBuildArtifacts@1
  inputs:
    PathtoPublish: '$(Build.ArtifactStagingDirectory)'
    ArtifactName: 'DXP Deployment Package'
    publishLocation: 'Container'
The completed YAML script will do the following:
- Pull down the latest code
- Restore Nuget Packages
- Build using MSBuild, and put the resulting code into a build directory
- Archive the files into a specific format and name
- “Publish” the resulting archive as a build artifact
This will allow us to access this code deployment package from our Release Pipeline.
The proper format for the publish package is documented over at Epi World.
If you wanted to make sure that the package was built properly, run your pipeline and make sure it succeeds, and then go into the logs for the job, and find where it says that an artifact was produced. It should say “1 artifact produced” and should be a link.

Once you click on this link, it should take you to another screen to show you the artifacts that were produced, which should look like the below image. If you click on the .nupkg file, it will download it.
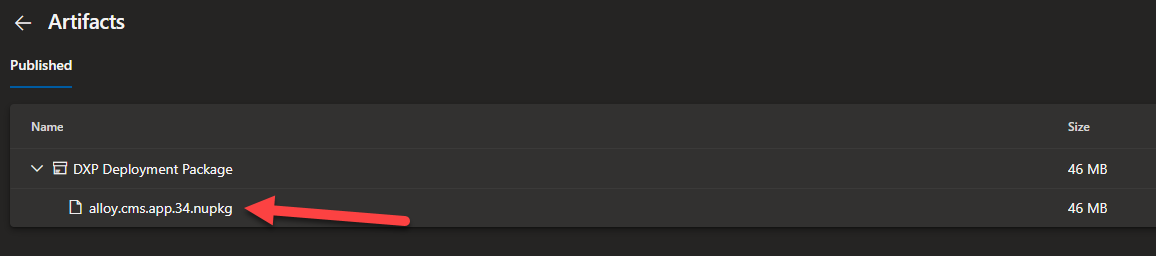
This file can be opened as a zipped archive, so feel free to open it to make sure it matches the format from the documentation.
Creating a Variable Group
If you’ve never used a variable group, this is an area that you can store any kind of key or string that you need to use within your environment. These can be used for all kinds of tasks, such as Pipelines and/or Releases.
For our case, we use this to store our Project ID, and all of our environment keys and secrets.
Firstly, we need to actually create a Variable Group that will hold these keys.
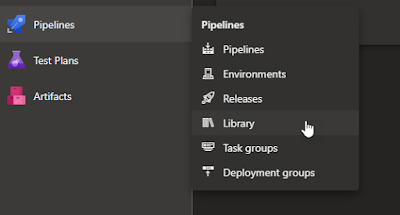
From within DevOps, if you go into the Pipeline section of the left-menu, click the “Library” option.
Once you’re in the library, you should see any Variable Groups that you have previously created.
Now, go ahead and click the ”+ Variable Group” button, and a new screen should come up.
I have named mine “Deployment Keys”, as it describes exactly what is going to live in here.
Next, feel free to put in a description of what the group is for. (This is optional)
We want to make sure the “Allow access to all pipelines” setting is on, as this is how we’re going to give the Release Pipeline the access to read these keys.
The next setting for linking secrets from an Azure Key vault can potentially be used, but I have not attempted this yet.
Now, as for the variables. I’ve personally used the naming scheme as follows:
dxp.<environment(s)>.<keytype>
For example, here’s what I’ve done for the different types of keys (which will be explained in the next section):
- dxp.projectid
- dxp.integration.clientkey
- dxp.integration.secretkey
- dxp.inteandprep.clientkey
- dxp.inteandprep.secretkey
Next, once you add the variables, you can choose whether they are “Secure” or not by clicking on the lock on the left column. This will show these keys in asterisks and will not allow you to copy the key back out of the variable.
See the screenshot below for my configurations that I use:
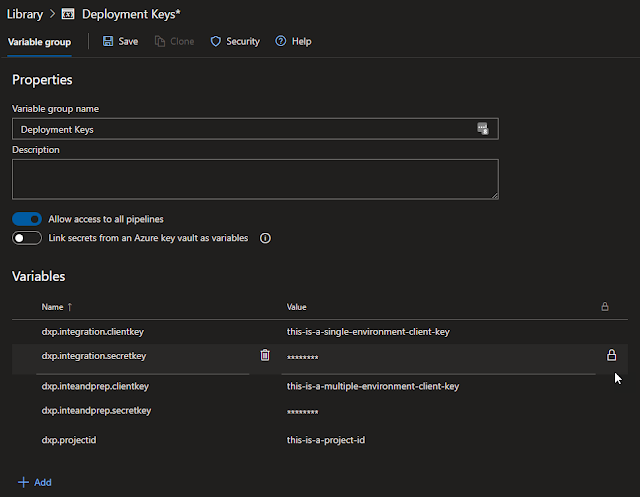
Make sure that once you enter the key values, press Save at the top of the screen to ensure the keys are saved and ready for use!
Generating API Keys via PAAS Portal
Now that we have our Variable Group created, we need to generate our API keys, which will allow us to do the deployments.
In order to start, we need to go into the PAAS Portal for your client/project. Look for the tab that says “API” and click that. In this screen you should see any keys that you’ve previously made. (See Image below)
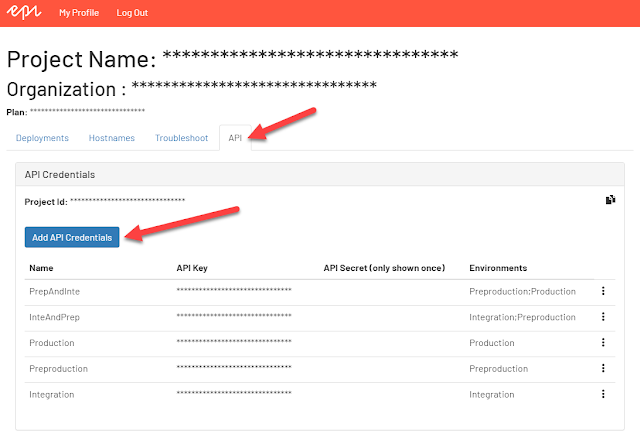
Take note of the Project ID (Above the big blue button).
We need to generate the five keys that we see above. five seems like a lot, but let me explain!
There are what I consider two types of keys here; Single Environment keys and Multiple Environment keys. (This is not Episerver’s terminology, as far as I know.)
Single Environment Keys are meant for interacting with just a single environment. This includes tasks such as Deployment from a file into an environment, or exporting a database, or querying for any in-progress deployments.
Multiple Environment keys are meant for interacting between environments. This includes tasks such as deployments from environment to environment, including a sync down.
Now, I’m sure you’re wondering. “Eric….Why wouldn’t I just generate one key for all three environments?”
You absolutely could do that, but with creating two sets of keys, we’re actually enhancing security and ensuring proper data flow.
In a typical environment, and as I mentioned in Part 2, a proper flow is as follows:
Integration → PreProduction → Production
For the Sync Down process, the proper flow is as follows:
Integration ← PreProduction ← Production
If you noticed, there is no arrow that ever goes between the Integration and Production environment, in either direction, nor do we want there to be.
By generating two sets of Multiple Environment keys never ever give the person publishing this the ability to do anything between these two environments directly.
This is a very similar reason to why we’re also generating a key for each of the environments independently. It locks down the ability for access to an environment that you may not wanting someone to have access to.
In the end, you can do this whatever way you want, based on how you want to ultimately have your DevOps environment set up.
Now, that being said, once you generate each set of keys, add them into the variable group that you created.
Remember, as on the screen, the secret key will only be shown once, so if you lose it somehow, you’ll have to create a new set of keys, and update the variable group accordingly.
Conclusion
Firstly, thank you everyone for sticking around through all three parts. I know we’re pretty far into this, but really haven’t even done too much, in terms of deployment, but it is absolutely coming. We’re so close!
At this point, from the contents of this post, you should be able to:
- Be able to Fork and connect the deployment scripts from GitHub to Azure DevOps
- Be able to build your solution and export an Artifact as a build output
- Be able to generate your PAAS Portal keys and create a Variable Group to store them
This means that we’ve completed all of the remaining setup, minus creating and configuring the Release Pipeline.