Optimizely CMS 12 – .NET 5.0 – Build/Deploy in DevOps (YAML)

The second I created a NET 5 project, the first anxiety-filled thought that ran through my head was something along the lines of… “How the heck am I going to build/deploy this to anywhere useful?!”
As I mentioned in my previous post about the DXCS006 error code, this is one of the first times that I have really started to work with NET 5/Core in any real capacity, so its a whole new world to me.
This all being said, the goal that I set for myself was to do the following:
- Learn the differences between the Build/Release process for CMS 11 & 12
- Create a Build Process
- Create a Release Process
- Tie it all together
In this post, we will go through the following:
- How do the NUPKG requirements differ?
- Creating a Build process for NET 5.0
- Creating a Build/Deploy process for NET 5.0
- Conclusion
How do the NUPKG requirements differ?
In Optimizely CMS 11 and below, the way that NUPKG files were built was “wwwroot/<files…>”
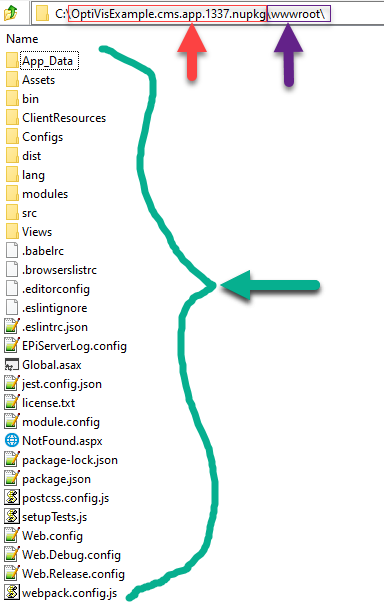
Obviously, since Optimizely CMS 12 is now on NET 5.0, the deployment format is different. The main difference is that there is no folder directly inside of the NUPKG file (wwwroot), it is just all of the dll files that were previously in the bin directory. The rest of the files are packaged up within this directory.
Example below:
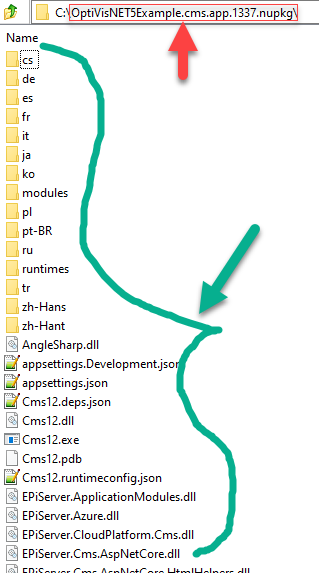
The easiest way to build out this format is to use the Visual Studio “Folder Deploy” or use the ‘dot net publish’ command.
Creating a Build process for NET 5.0
The first step in any project/solution is to make sure it builds, right?
Luckily, with NET 5.0, we have a new set of commands that we can use to restore and build the project.
- Restore Nuget
- Restore NPM (if applicable)
- Build NPM (if applicable)
- Build Projects/Solution
The high-level process that we’re going to do is the following: (should look familiar)
The NPM task commands have not changed, so strictly talking NET 5, the following commands will be used:
- dot net restore
- dot net build
It is as easy as that. A sample (and working) yaml file is below.
# .NET5.0
# Build and test .NET5.0 projects.

pool:
  vmImage: 'windows-latest'

variables:
  projects: '**/*.csproj'
  buildConfiguration: 'Release'
  coreFramework: 'net5.0'
  projectJsonFileDir: './'


steps:
- task: DotNetCoreCLI@2
  displayName: Restore
  inputs:
    command: restore
    projects: '$(projects)'
    feedsToUse: config
    nugetConfigPath: Nuget.config

- task: Npm@1
  displayName: 'npm install'
  inputs:
    command: 'install'
    workingDir: '$(projectJsonFileDir)'

- task: Npm@1
  displayName: 'Run Webpack Build'
  inputs:
    command: 'custom'
    workingDir: '$(projectJsonFileDir)'
    customCommand: 'run dev'

- task: DotNetCoreCLI@2
  displayName: Build
  inputs:
    projects: '$(projects)'
    arguments: '--configuration $(BuildConfiguration) --framework $(coreFramework)'
The uses for this in DevOps:
- Pull Request Gate/Build
- Commit Build Check
Creating a Build/Deploy process for NET 5.0
Now that we can Build, all that is left to do is just take what we did and package it up!
Similarly to the Build process, we are going to be leveraging the NET 5.0 commands for as much as we can.
The process should look like this all put together: (This should also look very familiar)
- Restore Nuget
- Restore NPM (if applicable)
- Build NPM (if applicable)
- Build Projects/Solution
- Publish Projects to folder location
- Copy Webpack files to dist folder (if applicable)
- Pack files into NUPKG format
- Publish Artifact NUPKG file
The NPM task, Copy file, Archive file, and Publish Artifact commands have not changed, so strictly talking NET 5, the following commands will be used:
- dot net restore
- dot net build
- dot net publish
It is as easy as that. A sample (and working) yaml file is below.
# .NET5.0
# Build and test .NET5.0 projects.

trigger:
- main

pool:
  vmImage: 'windows-latest'

variables:
  buildConfiguration: 'Release'
  coreFramework: 'net5.0'
  projects: '**/*.csproj'
  projectJsonFileDir: './'

steps:
- task: DotNetCoreCLI@2
  displayName: Restore
  inputs:
    command: restore
    projects: '$(projects)'
    feedsToUse: config
    nugetConfigPath: Nuget.config

- task: Npm@1
  displayName: 'npm install'
  inputs:
    command: 'install'
    workingDir: '$(projectJsonFileDir)'

- task: Npm@1
  displayName: 'Run Webpack Build'
  inputs:
    command: 'custom'
    workingDir: '$(projectJsonFileDir)'
    customCommand: 'run dev'

- task: DotNetCoreCLI@2
  displayName: Build
  inputs:
    projects: '$(projects)'
    arguments: '--configuration $(BuildConfiguration) --framework $(coreFramework)'

- task: DotNetCoreCLI@2
  displayName: Publish
  inputs:
    command: publish
    publishWebProjects: True
    arguments: '--configuration $(BuildConfiguration) --framework $(coreFramework) --output $(Agent.TempDirectory)\SitePackageContent\'
    zipAfterPublish: false
    modifyOutputPath: false

- task: CopyFiles@2
  displayName: 'Copy Webpack Dist'
  inputs:
    SourceFolder: '.\wwwroot\dist'
    Contents: '**'
    TargetFolder: '$(Agent.TempDirectory)\SitePackageContent\wwwroot\dist'
    CleanTargetFolder: true
    OverWrite: true

- task: ArchiveFiles@2
  displayName: 'Pack Files'
  inputs:
    rootFolderOrFile: '$(Agent.TempDirectory)\SitePackageContent\'
    includeRootFolder: false
    archiveFile: '$(Build.ArtifactStagingDirectory)/OptiVis.cms.app.$(Build.BuildId).nupkg'

- task: PublishBuildArtifacts@1
  displayName: 'Publish DXP Files'
  inputs:
    PathtoPublish: '$(build.artifactstagingdirectory)'
    ArtifactName: 'DXP Deployment Package'
    publishLocation: 'Container'
  condition: succeededOrFailed()
The uses for this in DevOps:
- CI/CD Release
- Artifact creation for environment-based releases
- The “buildConfiguration’ variable can be changed for each environment
Conclusion/TL:DR
Surprisingly, after these Build/Deploy steps are done, the rest of the DevOps processes are the same, since its just Uploading/Releasing a NUPKG file into the DXP environment. (I will have a small update to one script coming within the next few weeks)
The existing process can be viewed in my Deployment API Series – CMS 11 – Post 1, Post 2, Post 3 | Github repo
As I dig more into CMS 12, my main goal is to update my deployment scripts with any necessary updates, but also make sure to document any issues I come across with any of these deployment scenarios.
More to come!
As always, please reach out if you have any questions/comments/concerns.